Azure Static Web Apps (SWA) is an easy to use free service that automatically deploys your webapps to Azure from a code repository; such as Github or Azure DevOps.
I’ve been using SWA for quite a while now, and I am more than happy with the move. I was paying £6pcm for hosting for nearly 15 years. Granted, SWA didn’t exist back then, and I had need of a database, and PHP support etc etc. As I became ever busier in life and work, I just uploaded some static pages and forgot about them for far too long.
I’ve been working with Azure and M365 for over a decade now, so when SWA was released it was a simple decision to move my website into Azure rather than keep it on a traditional hosting provider.
I’d like to give a huge shout-out to Mythic Beasts though, I was with them a long time and they were fantastic, service was always up, and their customer service people are great!
In typical style from Microsoft, SWA has a free tier which is more than enough for my needs. Unless you are running a site that needs more than 100GB bandwidth per month, it will probably meet your needs as well. You can find more information on Microsoft’s website.
In this article we’re going to deploy a no-framework basic static web app, just HTML, CSS & Javascript. You can either clone one from GitHub, or you can provide your own.
Prerequisites #
Once you have your accounts created, and everything is installed and ready, we can crack on!
Create a repository #
You’ll need your own GitHub repository to deploy your webapp from as SWA only supports deployments from a code repository, rather than the traditional FTP client.
If you don’t have a repository or an existing website, use the vanilla-basic from staticwebdev to get you started. In the top corner of GitHub, select Use this template to make your own repository based on vanilla-basic
Clone your repo #
Now that you have your repository created in your GitHub account, you need to clone it to your local machine. There’s a lot of ways to do this, but the simplest is using the Git command line
git clone https://github.com/<ACCOUNT_NAME>/my-first-static-web-app.git
You can also use VSCode or GitHub Desktop to clone your repository to your local machine.
In VSCode, go to File > Open Folder and open the cloned repository in the editor.
Install Azure Static Web Apps extension #
If you don’t already have the Azure Static Web Apps extension, you can install it through the Extensions panel.
- Select
View > Extensions - In the Search Extensions in Marketplace, type
Azure Static Web Apps - Select Install
Create a static web app #
The next step is to set up the SWA through the extension. This will create the SWA in Azure, the GitHub Action on your repository, and prep your codebase for deployment.
- Inside VSCode, select the Azure logo in the Activity Bar to open the Azure extensions window.

- Press
F1to open the VSCode command palette. - Start typing Create static web app in the command box.
- Select Azure Static Web Apps: Create static web app….
- Select your Azure subscription.
- Enter an app name. <– This cannot be changed once created.
- Select the region closest to you.
- Enter these values.
| Setting | Value |
|---|---|
| Framework | Select Custom |
| Location of application code | Enter /src |
| Build location | Enter /src |
- Once the app is created, a confirmation notification is shown in Visual Studio Code.

Check your repository online, and if GitHub presents you with a button labeled Enable Actions on this repository, make sure you enable them to allow the build action to run on your repository.
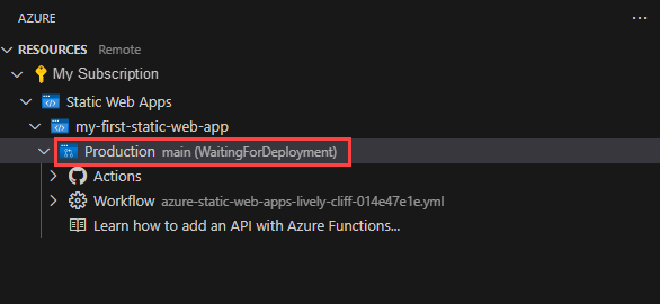
As part of the creation process, the new GitHub action will run for the first time and deploy your code. You can see the progress in GitHub or you can use the Azure Static Web Apps extension as it reports the build status in VSCode.

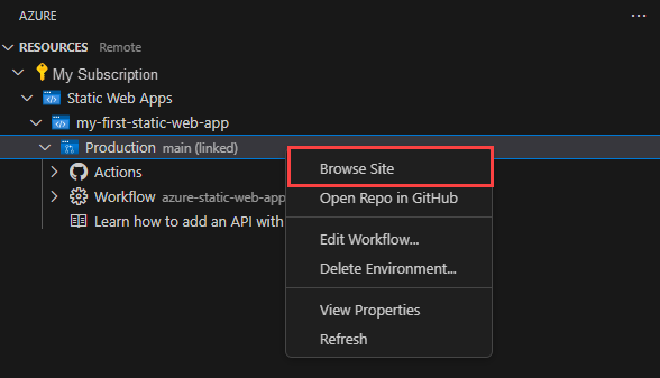
Once the deployment is complete, you can navigate directly to your website.
- To view the website in the browser, right-click the project in the Static Web Apps extension, and select Browse Site

Clean up resources #
If you’re not going to continue to use this application, you can delete the Azure Static Web Apps instance through the extension.
In the VSCode Azure window, return to the Resources section and under Static Web Apps, right-click app name and select Delete.
Conclusion #
I’m not a developer, I just like to play around and build things. The architecture of the service, how it all works and how each piece fits together is more my cup of tea, but I have to admit, once you have done this a couple of times its a relatively simple process to follow and integrate into your workflow.
Once your SWA is set up, and your GitHub Action is working, you can now just focus on coding, and once your code is pushed to the main branch, the GitHub Action will take care of deploying your site.
The added bonuses of version control not only allows you revert to a previous build; each branch, named and pull request automatically spins up a development SWA environment for you to test before merging and deploying new code. Read more about Preview environments.
I have integrated this workflow into my development work, and I love it.
What’s next #
In the next article we’ll take a look at how you can add an API to your SWA with Azure Functions.
